In Yard Editor, click  (the Draw Yard Perimeter tool).
Follow these instructions to draw the yard perimeter in your placeholder yard. You must have completed the previous steps in sequence.
Before you begin:
Set up a basic N4 Topology
Create a placeholder yard model (on page 1)
Add Bin Name Tables and Bin Names to the placeholder yard model (on page 1)
Create and upload the placeholder image map (replacement topic) (on page 1)
Set Reference Points (on page 1)
To draw the yard perimeter:
In Yard Editor, click (the Draw Yard Perimeter tool).
On the map, click the top left corner of the yard. This is where you start to draw the polygon (in this case, a simple rectangle) that forms the boundary. A little orange circle appears.
Drag the orange circle over to the top right corner and click. This draws one leg of the polygon. Notice that the tool expects you to add more points; it remains engaged, placing an orange mask across the area you create.
Zoom up on the image map using the magnifying tool. When drawing a perimeter, it is helpful to have the whole yard visible, but as large as possible.

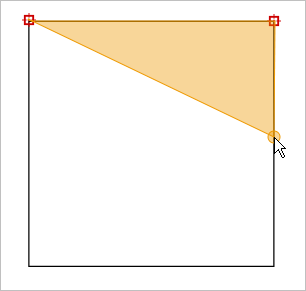
Continue dragging the perimeter tool down to the bottom right corner, clicking once, and then to the bottom left corner, clicking once.
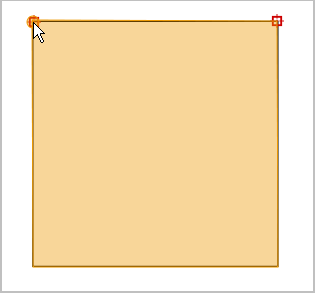
If you double-click a non-terminal point, Yard Editor draws the full perimeter using only the points you have placed. To fix an unfinished perimeter, select Actions  Reset Geometries in Yard Editor. This deletes the perimeter points you have drawn, and lets you start over with the perimeter tool.
Finish the rectangle by double-clicking the first point. When you have clicked all four points of the rectangle, and then double-click the first point N4 replaces the orange film with an open black perimeter. The other Yard Editor tools display on the left.

Next step(s):
Set up blocks (on page 1)